Laravel 8: REST API Authentication with Sanctum
Laravel 8 Sanctum - Laravel sanctum provides featherweight authentication system for Single Page Application (SPA), mobile application and simple token based API. Sanctum allows each app user to generate multiple API tokens for their account. These tokens can be assigned capabilities or scopes that determine which actions the token is allowed to perform.
In this article I will share a tutorial on how to create REST API Authentication and protect routes using Sanctum in Laravel 8.
Laravel 8 Sanctum: REST API Authentication
Step 1: Install Laravel
//via Laravel Installer
composer global require laravel/installer
laravel new laravel8-sanctum

//via Composer
composer create-project laravel/laravel laravel8-sanctum
In this first step, we need to install the latest version of laravel (currently version 8) which we will try to implement to create REST API authentication using sanctum. For laravel installation, you can use the laravel installer or use composer like the example above.
Please choose one method you want to use for laravel installation. From the two examples of laravel installation commands above, they will both generate a laravel project with the name laravel8-sanctum.
Wait until the installation process is complete and when it's finished, don't forget to enter the project directory using the command cd laravel8-sanctum.
Step 2: Setup Database
DB_CONNECTION=mysql
DB_HOST=127.0.0.1
DB_PORT=3306
DB_DATABASE=laravel8_sanctum
DB_USERNAME=root
DB_PASSWORD=
Next, create a new database to experiment with creating REST API authentication in laravel 8 using sanctum. If you are using xampp as local development, please create a new database at localhost/phpmyadmin. Here I give an example, I created a new database with the name laravel8_sanctum. Then don't forget to also adjust the DB_DATABASE in the .env file as in the example above.
Step 3: Install Sanctum
composer require laravel/sanctumWe can install sanctum via composer package manager with the command as above.
php artisan vendor:publish --provider="Laravel\Sanctum\SanctumServiceProvider"Next, we have to publish the sanctum configuration and migration files using the artisan vendor:publish command or as above. The sanctum configuration file will be placed in the config directory.
php artisan migrateThen, we have to run the database migration. Sanctum will create a table in the database to store API tokens.
Step 4: Create AuthController
php artisan make:controller API/AuthControllerIn the fourth step, we create a new controller file with the name AuthController in the app/Http/Controllers/API folder using the command as above. We will use this controller file later to create logic authentication in laravel 8 using sanctum.
<?php
namespace App\Http\Controllers\API;

use App\Http\Controllers\Controller;
use Illuminate\Http\Request;
use Illuminate\Support\Facades\Hash;
use Auth;
use Validator;
use App\Models\User;

class AuthController extends Controller
{
    public function register(Request $request)
    {
        $validator = Validator::make($request->all(),[
            'name' => 'required|string|max:255',
            'email' => 'required|string|email|max:255|unique:users',
            'password' => 'required|string|min:8'
        ]);

        if($validator->fails()){
            return response()->json($validator->errors());
        }

        $user = User::create([
            'name' => $request->name,
            'email' => $request->email,
            'password' => Hash::make($request->password)
         ]);

        $token = $user->createToken('auth_token')->plainTextToken;

        return response()
            ->json(['data' => $user,'access_token' => $token, 'token_type' => 'Bearer', ]);
    }

    public function login(Request $request)
    {
        if (!Auth::attempt($request->only('email', 'password')))
        {
            return response()
                ->json(['message' => 'Unauthorized'], 401);
        }

        $user = User::where('email', $request['email'])->firstOrFail();

        $token = $user->createToken('auth_token')->plainTextToken;

        return response()
            ->json(['message' => 'Hi '.$user->name.', welcome to home','access_token' => $token, 'token_type' => 'Bearer', ]);
    }

    // method for user logout and delete token
    public function logout()
    {
        auth()->user()->tokens()->delete();

        return [
            'message' => 'You have successfully logged out and the token was successfully deleted'
        ];
    }
}
After the AuthController.php file has been successfully generated, now please open the file and change all the code to be as above. In this AuthController.php file, we create register, login and logout methods.
Explanation of these methods:
- Register. In this method, we add validation for name, email and password. If the POST request data fails to be validated, it will send an error response from the validation. However, if the POST request is successfully validated, the data from the POST request will be stored in the users table and will create a new token, and will send a json response containing details of the data that has been added along with the token that has been successfully created.
- Login. In this method, we add logic to check whether the entered email and password really match one of the data in the users table. If the data fails to be found in the users table, the resulting response will be 401 or Unauthorized. But if the data is found, it will create a new token for that user which will be stored in the personal_access_tokens table.
- Logout. This method will delete the user session by deleting all tokens belonging to that user in the personal_access_token table.
Step 5: Define Route
//API route for register new user
Route::post('/register', [App\Http\Controllers\API\AuthController::class, 'register']);
//API route for login user
Route::post('/login', [App\Http\Controllers\API\AuthController::class, 'login']);

//Protecting Routes
Route::group(['middleware' => ['auth:sanctum']], function () {
    Route::get('/profile', function(Request $request) {
        return auth()->user();
    });

    // API route for logout user
    Route::post('/logout', [App\Http\Controllers\API\AuthController::class, 'logout']);
});
Next, open the routes/api.php file and add the route code as above. Here we add a new route that is register, login, profile and logout. To route profile and logout, we use sanctum authenticated guard ('middleware' => ['auth:sanctum']). This means that both routes can only be accessed by authenticated users or access using tokens.
Step 6: Testing API
Now it's time to test the REST API authentication that we have removed using laravel 8 and sanctum.
php artisan serveFirst, make sure you have run your laravel project with the php artisan serve command. With this command, by default Laravel will give your Laravel project access with URL 127.0.0.1:8000, but you can also change the port as you wish by adding something like --port=8090.
We can access the API that we have created by accessing the URL 127.0.0.1:8000/api. In this API testing step, I will provide examples of how to make API requests using Postman as below.
Register

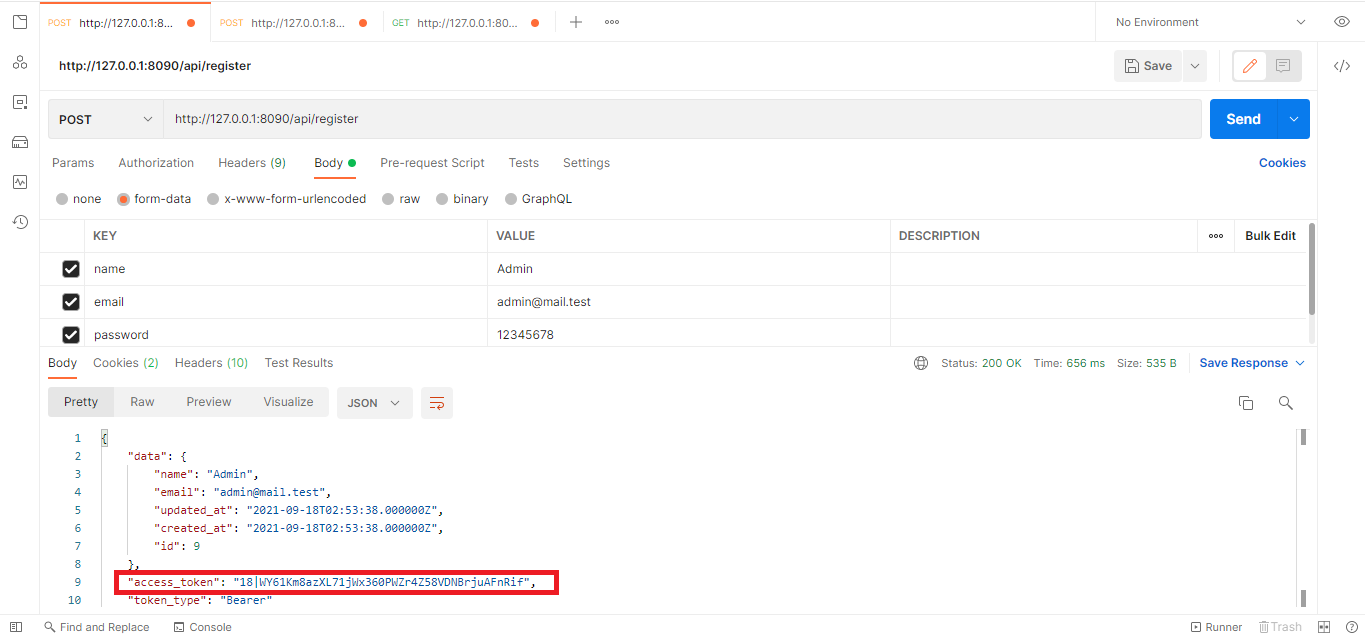
For first testing, we try to register first. To register or add a new user, make a POST request to 127.0.0.1:8000/api/register. Then on the Body tab, please add the key name, email and password along with the value you want to register. Because in the register method in the AuthController file, we have added validation for the password, it must be at least 8 characters long, so for the password value, make sure it contains at least 8 characters (as shown above).
If the key and value are already filled in, continue by clicking the Send button. Then the data that we have entered has been successfully added to the users table and we have managed to get a token for us to use.

If we try to register with an existing email in the users table and enter a password of less than 8 characters, the data will not be added to the users table and will send a response as shown above.
Login

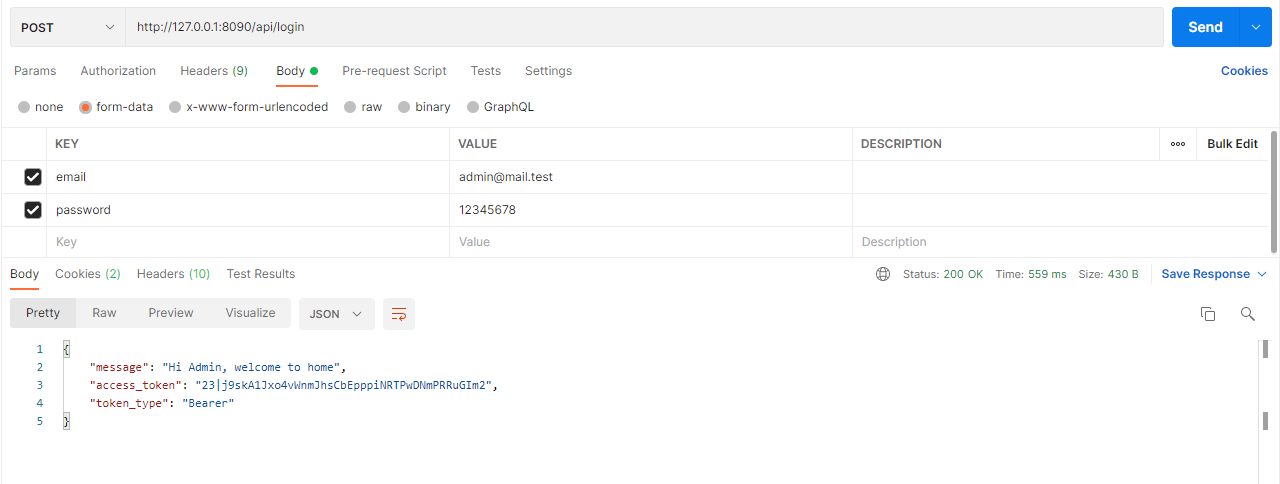
After successfully registering, now we try to login using the registered email and password. Make a POST request to 127.0.0.1:8000/api/login, then in the body, add the email key and password along with the value.
If you have added the key and value, continue by clicking the Send button. So as a result, if the email that we input is found in the users table and the password we entered is also true to that email, then the resulting response will be like the picture above with HTTP 200 status. But if the value we input is wrong, then the response displayed will be unauthorized or HTTP status 401.
Get Profile Data

Okay, now we will try to get the details of the user data that we are using to login. Because in the routes/api.php file, we have wrapped the api/profile route with 'middleware' => ['auth:sanctum'], so to be able to access the profile, we have to login first.
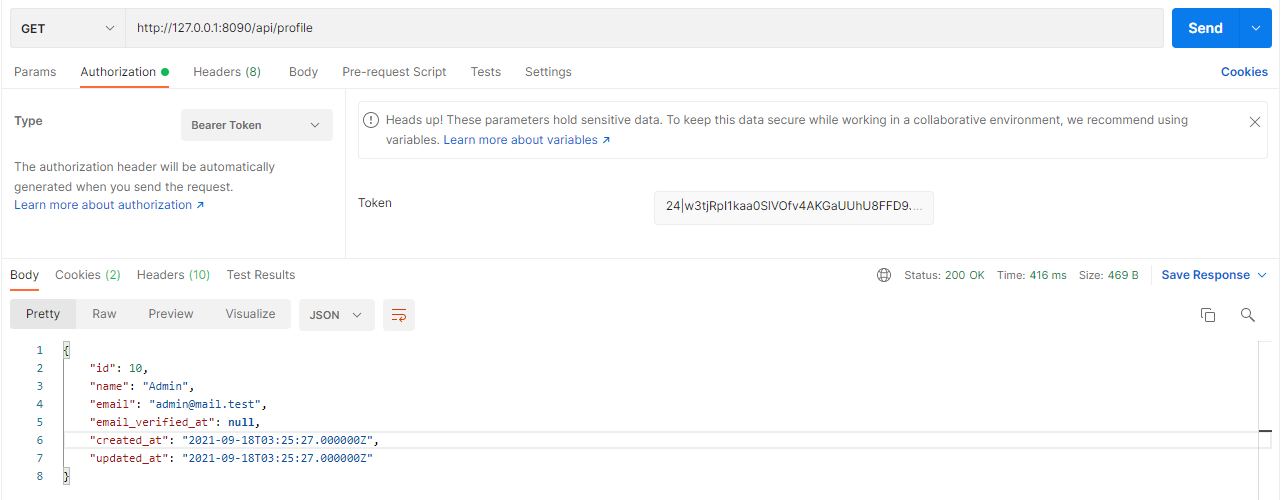
To display the details of the user we use to login, make a GET request to 127.0.0.1:8000/api/profile. Then on the Authorization tab, select the Beared Token type and enter the token that was obtained when logging in earlier.
Then click the Send button. If the token we entered is correct, then the response displayed will be like the image above with user detail data.
Logout

The last experiment, we will try the REST API for user logout. Make a POST request to 127.0.0.1:8000/api/logout, on the Authorization tab, select the Bearer Token type and enter the token that was obtained when you successfully logged in.
Click Send, then all tokens owned by the user will be deleted and the response message displayed will be as shown above.
Conclusion
In this tutorial article, we have learned what sanctum is and learned how to create REST API authentication using Sanctum in laravel version 8. Apart from that, we have also learned how to use Laravel Sanctum to grant access to users by generating tokens that can be used to authenticate and grant users access to use the Laravel API.
Hopefully this article can be useful, good luck and see you in the next article.👋
📖 Full Documentation: Laravel Sanctum
- Cara Mengatasi Error XAMPP: MySQL shutdown unexpectedly 23 Oktober 2021 68117 views
- Tutorial CRUD (Create, Read, Update & Delete) Codeigniter 4 dengan Bootstrap 14 Oktober 2021 33546 views
- Laravel 8: REST API Authentication dengan Sanctum 17 September 2021 32623 views
- Membuat REST API CRUD di Laravel 8 dengan Sanctum 18 September 2021 28817 views
- Contoh Cara Menggunakan Sweet Alert di Laravel 8 27 Agustus 2021 28182 views


