Easy Ways to Upload or Deploy Laravel Project to Shared Hosting
Upload or Deploy Laravel Shared Hosting - If you have a laravel project then you want to share it or publish it online, maybe you will need hosting to be able to make the laravel project accessible online. Shared hosting is a solution for those of you who are looking for cheap hosting. Shared hosting is widely chosen because the rental fee is relatively cheap. To upload a laravel project to shared hosting, the process is not the same as uploading HTML files on shared hosting, there are some adjustments that we have to do. Most shared hosting also doesn't provide SSH terminal, so those of us who want to use shared hosting to upload laravel projects won't be able to use commands like php artisan cache:clear, php artisan storage:link or others. To run these laravel artisan commands on shared hosting, we can use a cronjob or it could be a symlink.
In this article, I will provide a complete guide or tutorial on how to easily upload a laravel project to shared hosting. Here I will use a shared hosting service from Niagahoster because in my experience Niagahoster has proven its quality both in terms of service or support, website speed, uptime guarantee and others. If you are interested in uploading your laravel project to Niagahoster shared hosting, you can order shared hosting here and use the voucher code "codelapan" at checkout to get a discount.
And in this experiment, I will try to upload or deploy the laravel project website company profile that I previously shared with shared hosting. If you follow this tutorial, you can use the source code or you can also follow using your own source code.
Baca: Download Source Code Website Company Profile (Laravel 8 & Bootstrap)
Table of Contents
Creating a New Database on Hosting
Before entering the steps to upload a laravel project to hosting, we must prepare the database on the hosting first. What are the steps? let's see the explanation below.
Setup MySQLDB
The first step is to create a new database on hosting, please enter cPanel and select MySqlDB. in MySqlDB, first we will create a new database as above and then continue by pressing the Create Database button.
After going through the process of creating a new database, now we need to create a new user that we will use to access the database later. Please fill in the available input form as shown above then continue by pressing the Create User button.
Then we will add the user account access that we created earlier to the database.

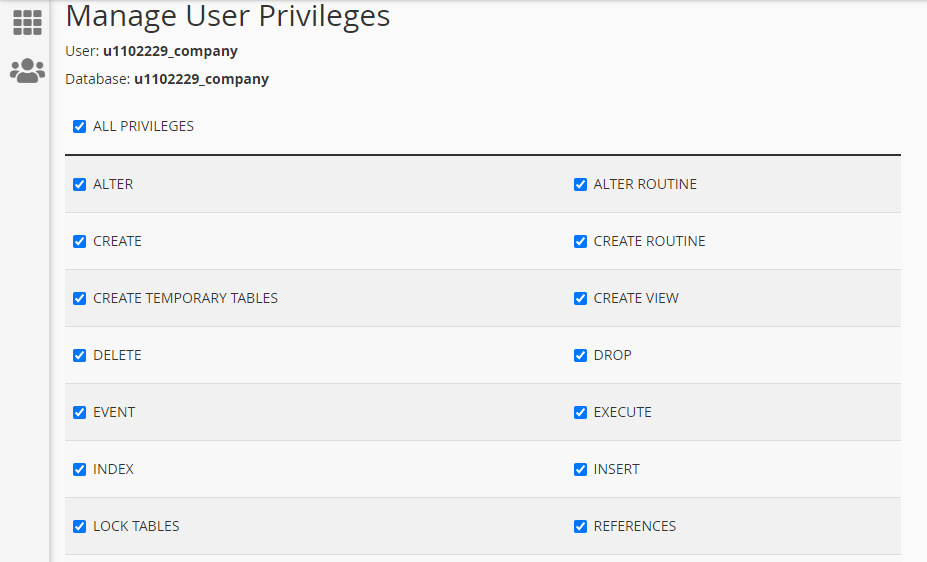
After pressing the Add button on the Add User to Database, we will be faced with options as shown above. Here, please choose according to your needs, and in this article I will choose All Privilages for the user u1102229_company in the u1102229_company database. When finished selecting privileges, continue by pressing the Make Changes button.
Import Database in phpMyAdmin
After completing all the processes in the MySqlDB setup step, now please enter phpMyAdmin in cPanel. In PhpMyAdmin, please select the database we just created in the previous MySqlDB setup step. Then go to the Import tab, find the company.sql file that I have included in the Laravel company profile source code repostory, continue by pressing the send or Go button.
Okay, so far we have succeeded in creating a database on phpMyAdmin shared hosting. We continue by preparing laravel files that we will upload to shared hosting.
Method 1: Upload Laravel to Shared Hosting
In this article, I will share 2 ways on how to upload a laravel project to shared hosting. In this first method I will separate the public folder which I will upload to public_html (on hosting) and the other folder I will upload to the root hosting.
Edit .ENV
APP_NAME=Laravel
APP_ENV=production
APP_KEY=base64:wbCizzT+msaj0kL3fcQ/ILOKP9QcUCnkaXFSZtcSHmc=
APP_DEBUG=false
APP_URL=https://example.com

LOG_CHANNEL=stack
LOG_LEVEL=debug

DB_CONNECTION=mysql
DB_HOST=127.0.0.1
DB_PORT=3306
DB_DATABASE=yourDB
DB_USERNAME=yourUsername
DB_PASSWORD=yourPassword123

BROADCAST_DRIVER=log
CACHE_DRIVER=file
QUEUE_CONNECTION=sync
SESSION_DRIVER=file
SESSION_LIFETIME=120

REDIS_HOST=127.0.0.1
REDIS_PASSWORD=null
REDIS_PORT=6379

MAIL_MAILER=smtp
MAIL_HOST=smtp.mailtrap.io
MAIL_PORT=2525
MAIL_USERNAME=null
MAIL_PASSWORD=null
MAIL_ENCRYPTION=null
MAIL_FROM_ADDRESS=null
MAIL_FROM_NAME="${APP_NAME}"

AWS_ACCESS_KEY_ID=
AWS_SECRET_ACCESS_KEY=
AWS_DEFAULT_REGION=us-east-1
AWS_BUCKET=

PUSHER_APP_ID=
PUSHER_APP_KEY=
PUSHER_APP_SECRET=
PUSHER_APP_CLUSTER=mt1

MIX_PUSHER_APP_KEY="${PUSHER_APP_KEY}"
MIX_PUSHER_APP_CLUSTER="${PUSHER_APP_CLUSTER}"
Before compressing to zip for laravel files, please edit your .env file first. In APP_ENV can be changed from local to production, APP_DEBUG please change from true to false so that when an error occurs on live it does not display an error display as when it is local, APP_URL please adjust it to your domain and DB_DATABASE, DB_USERNAME, DB_PASSWORD please adjust to what has been created in the previous MySqlDB setup step.
Compress Laravel Project to ZIP Format
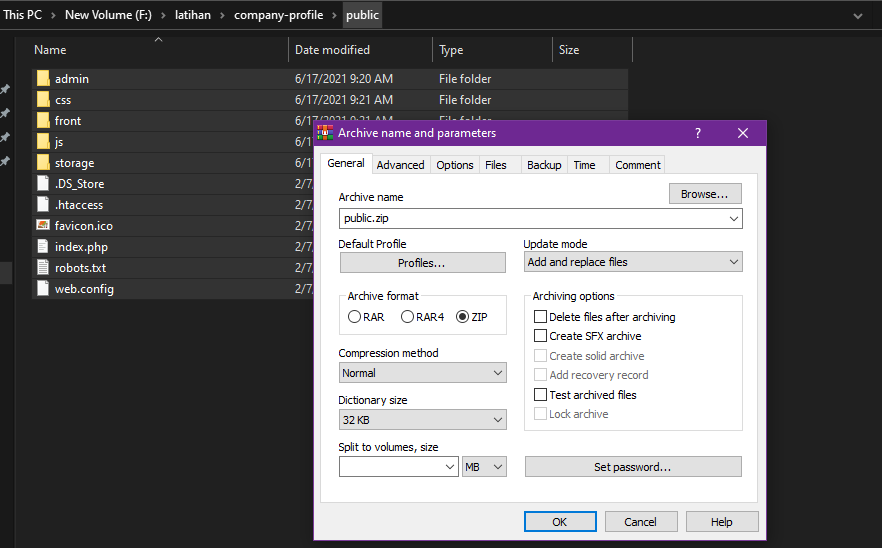
Now we will compress the folder or file in the public folder to ZIP format. This public.zip file will later be uploaded to public_html (on hosting).
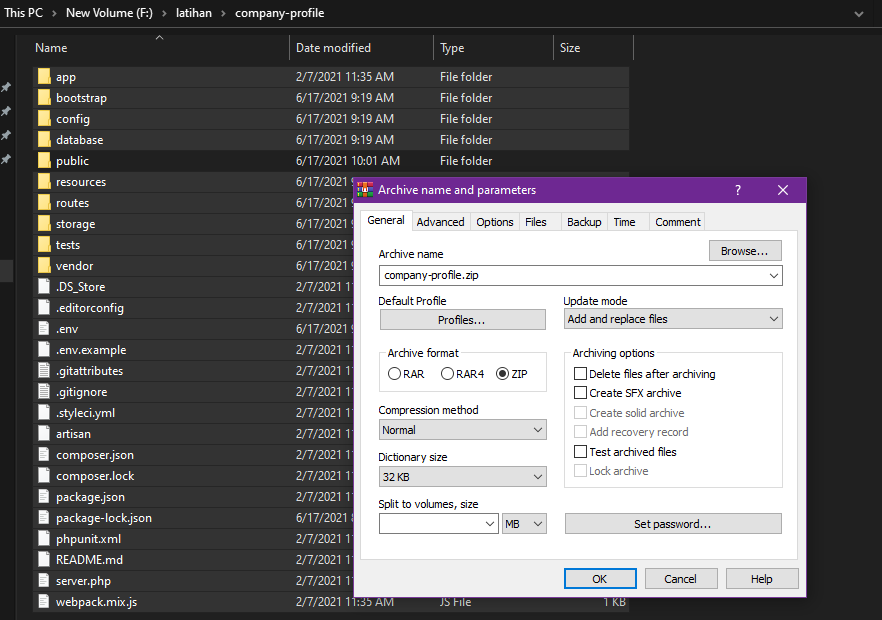
Then please exit the public folder, compress all folders or files (except the public folder) to zip format. We will upload this company-profile.zip file to the root folder of the file manager on the hosting.
*Note: the node_modules folder can be deleted or not included when uploading to hosting.
Upload ZIP File to Hosting
Please enter cPanel, then select File Manager. On the upload menu tab, please click and then look for the company-profile.zip file that we compressed earlier. If the upload process is complete, please extract the company-profile.zip file that we uploaded earlier and we will extract it to the companyprofile folder.
Okay, now we go to the public_html folder. Here the process is the same as the previous process, namely clicking the Upload menu tab, looking for the public.zip file which contains the folder or files contained in the Laravel public folder that we have compressed to the previous zip. After the public.zip file upload process is complete, now please extract the public.zip file in the public_html folder.
Edit index.php
We go into the index.php file in the public_html folder to adjust the path. Please find the code as below in the index.php file
require __DIR__.'/../vendor/autoload.php';
Change to
require __DIR__.'/../companyprofile/vendor/autoload.php';And look for the code below
$app = require_once __DIR__.'/../bootstrap/app.php';Change to
$app = require_once __DIR__.'/../companyprofile/bootstrap/app.php';Creating a Storage Link on Shared Hosting
In the public_html folder we may already have a storage folder, but actually the folder doesn't work when we upload it to the hosting because we bring the folder from local and it's not connected to the storage folder. What's the solution ? the solution we can delete the folder and then create a storage link again. How do I create a storage link on shared hosting that doesn't have SSH features? Okay, indeed some shared hosting does not provide an SSH terminal for us to use to run artisan commands such as php artisan storage:link. But there is another way to create a storage link on shared hosting, namely with CronJob.
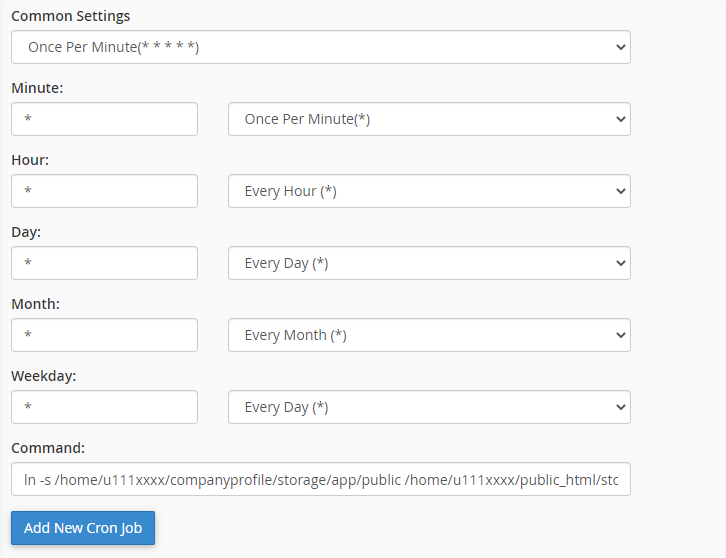
ln -s /home/u111xxxx/companyprofile/storage/app/public /home/u111xxxx/public_html/storageThe script line above is an example of a script to create a storage link folder with a cronjob on shared hosting.
Please open the Cronjob menu in cPanel, then enter the available input forms. For Common Settings, please select Once per Five Minutes only. Then in the command, please fill it with the script that I have included above. In the script, please replace u111xxxx with your username or cPanel account name and companyprofile, please also adjust it to your project folder in the root folder of the file manager. If all the input forms are filled in, click Add New Cron Job.
Please wait about 5 minutes by checking the public_html folder by reloading the page or refreshing the page. If the storage folder is already available, immediately delete the cronjob because if not, the cronjob will continue to run the process.
Now we should have successfully uploaded and online the laravel project on shared hosting. Please try by accessing your domain in a browser.
Method 2: Upload Laravel to Shared Hosting
After successfully uploading a laravel project to shared hosting in the first way, this time I will share the second way to upload a laravel project to shared hosting. In this second method, we will not separate the public folder. So, all folders or files in our Laravel project will be uploaded to the public_html folder on the hosting.
We return to the Laravel project in local. Please copy the file. just paste it in the root folder of the laravel project.
Open the file public_html/index.php, look for the code as below
require __DIR__.'/../vendor/autoload.php';Change to
require __DIR__.'/vendor/autoload.php';and look for the code again as below
$app = require_once __DIR__.'/../bootstrap/app.php';Change to
$app = require_once __DIR__.'/bootstrap/app.php';Now, compress all laravel project folders or files including public folder to zip format. We will upload this zip file to the public_html folder on shared hosting.
Open File Manager in cPanel, then go to public_html. On the upload menu tab, please upload the zip file that we compressed earlier. After the upload is successful, extract the zip file in the public_html folder.
Now if we try to access our domain in the browser, our laravel project website is successfully online but all assets such as images still don't appear, for that we need to run the storage link via cronjob again as in method 1. And before entering the cronjob, we have to delete it first the storage folder in the public folder, because the folder does not work when brought from local to hosting.
ln -s /home/u111xxxx/public_html/storage/app/public /home/u111xxxx/public_html/public/storagePlease enter the Cronjob in your cPanel, then select the common settings "Once per Five Minutes" and in the command enter the script like the example above. Replace u111xxxx, adjust it to your username or cPanel account. Wait for about 5 minutes while periodically checking the public folder by refreshing or reloading the page. If the storage folder has appeared, immediately delete the Cronjob so that the script does not run continuously.
Okay, if the storage folder in the public folder has appeared, now if we try to access our domain again in the browser, then all assets such as images in the storage folder have successfully appeared. Easy and fast to upload or deploy laravel projects to shared hosting?
Conclusion
In this article, we have learned how to upload a laravel project to shared hosting using 2 ways. The first way we separate the public folder with another Laravel folder or file. And the second way, we don't need to separate the public folder with other laravel folders or files, but we need to copy the .htaccess and index.php files in the public folder and paste them in the laravel project root folder (aligned with the app folder). , resources, routes, etc.) and make adjustments to the code in the index.php file. Please decide for yourself which method you will use to upload or deploy a laravel project to shared hosting.
That's an article about uploading or deploy a laravel project to shared hosting this time, if you have suggestions, criticisms or anything you want to discuss, please write your comments in the comment form provided below. See you 🚀 🚀 🚀
Credit: Data illustrations by Storyset
- Cara Mengatasi Error XAMPP: MySQL shutdown unexpectedly 23 Oktober 2021 68249 views
- Tutorial CRUD (Create, Read, Update & Delete) Codeigniter 4 dengan Bootstrap 14 Oktober 2021 33746 views
- Laravel 8: REST API Authentication dengan Sanctum 17 September 2021 32656 views
- Membuat REST API CRUD di Laravel 8 dengan Sanctum 18 September 2021 28843 views
- Contoh Cara Menggunakan Sweet Alert di Laravel 8 27 Agustus 2021 28216 views


.PNG)
