


How to Add Google ReCaptcha in Laravel 8
Google ReCaptcha Laravel 8 - In the previous article we have shared an article about "Tutorial How to Easily Make Captcha in Laravel 8". And in this article, we will share about how to implement or add a challenge or challenge google recaptcha in laravel 8.
Read: Tutorial How to Easily Make Captcha in Laravel 8
Table of Contents
What is Google ReCaptcha?
Google Recaptcha can protect a website or app from fraud and abuse without creating friction with the program. Recaptcha uses advanced risk analysis and adaptive challenges to prevent malicious software (robots) from abusing websites or applications. With reCaptcha, our site will be protected from robot (non-human) type users. Because by successfully completing the challenge or google recaptcha challenge, users can continue to use the website or application such as making purchases, viewing pages or creating accounts and users who are detected by robots (unable to complete challenges or challenges) will not be able to continue and will be blocked.
Google ReCaptcha is usually used on websites where data collect features are available, such as registering, logging in, buying and selling transactions and others. Well, in this experiment we will try to add google recaptcha to the register form on laravel 8.
Sign up for Google Recaptcha
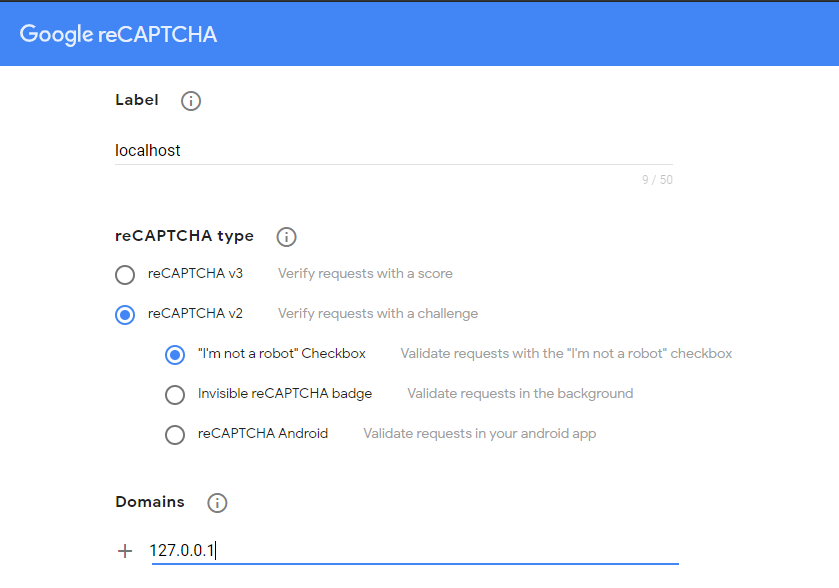
Before we can use google recaptcha on a laravel project, we must first register a new site at google.com/recaptcha/admin/create. Please open the site, then label according to the name of our site, but because in this experiment we will try it on localhost, the label can be filled with localhost. Then because we will display the google recaptcha checkbox version and for now the checkbox version is only available in reCaptcha v2, then for the reCaptcha type please select the "I'm not a robot" checkbox. And, we add the domain 127.0.0.1 so that google recaptcha can appear when we access the laravel project with 127.0.0.1:8000. If you are used to accessing laravel projects on localhost with localhost:8000 or laravel.test, then add localhost and laravel.test to that domain as well.
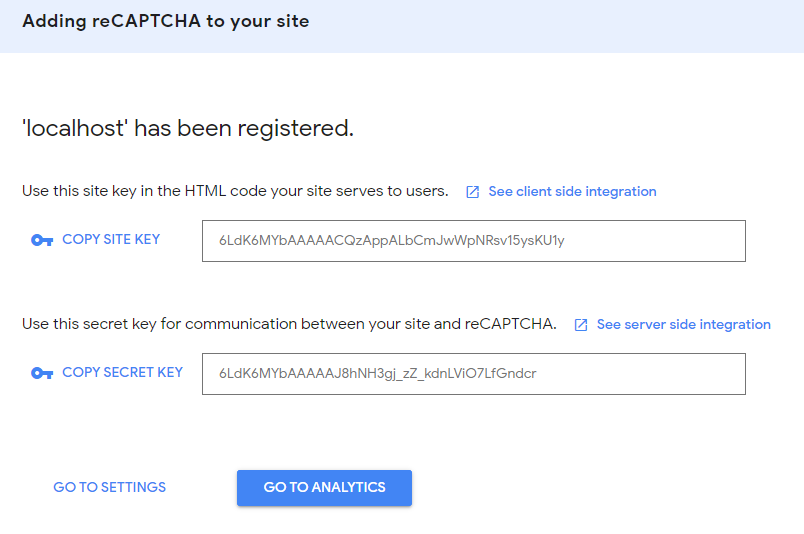
After completing the registration process and clicking submit, we will be given a Site Key and Secret Key as shown in the image above. Save the two keys for us to copy in the .env file later in the next step.
Start Coding
As in the previous Laravel tutorial articles, in this article we will also start from scratch, starting from installing the latest version of Laravel, installing Laravel UI to create an authentication system, installing the Google Recaptcha package and so on.
Install Laravel
composer create-project laravel/laravel laravel-google-recaptchaWe start by installing the latest version of laravel (currently version 8) via composer. Open a terminal, then run the command as above. With this command, we will create a new laravel project with the name laravel-google-recaptcha.
Install Laravel UI
composer require laravel/ui
php artisan ui bootstrap --auth
In this experiment, we will use the laravel ui package to create an authentication system that we will add google recaptcha to later. Run the above two commands sequentially to start installing the bootstrap version of laravel ui.
npm install && npm run devAfter installing the laravel ui package and creating the scaffolding for the frontend, the laravel package.json file will include the bootstrap package to help us start prototyping our front end project using bootstrap.
before compiling the CSS, install the project frontend dependencies using the Node Package Module (NPM) with the npm install command. After the dependencies are installed using the npm install command, we can compile the SASS file to plain CSS using laravel mix. The npm run dev command will process the instructions in the webpack.mix.js file. The compiled CSS and Javascript results will be placed or located in the public/css and public/js directories.
To shorten NPM install time and compile CSS and Javascript files, use the npm install && npm run dev command as above.
Create New Database and Migrate
DB_CONNECTION=mysql
DB_HOST=127.0.0.1
DB_PORT=3306
DB_DATABASE=laravel-google-recaptcha
DB_USERNAME=root
DB_PASSWORD=
To accommodate the data of users who successfully passed the google recaptcha challenge and successfully registered, we need to create a new database. If you are using XAMPP as a local server, please create a new database at localhost/phpmyadmin. Here I will create a new database with the name laravel-google-recaptcha, and after that don't forget to adjust the DB_DATABASE in the .env file as in the example above. After that, run the php artisan migrate command to migrate the tables to the newly created database.
RECAPTCHA_SITE_KEY=YOUR_API_SITE_KEY
RECAPTCHA_SECRET_KEY=YOUR_API_SECRET_KEY
And add 2 new lines in the .env file namely RECAPTCHA_SITE_KEY and RECAPTCHA_SECRET_KEY. Then fill in the key in both lines with the key that we got when registering Google Recaptcha in the previous step.
Install Laravel ReCaptcha
composer require biscolab/laravel-recaptchaIn this experiment, we will use the Laravel ReCaptcha package from biscolab for implementation or add the google recaptcha challenge to the register feature in our laravel project. For that, please run the command as above to install the package.
php artisan vendor:publish --provider="Biscolab\ReCaptcha\ReCaptchaServiceProvider"Publish the Laravel Recaptcha config file by running the command as above.
Configuration
'version' => 'v2', // supported: "v3"|"v2"|"invisible"Then open the laravel recaptcha configuration file located in the config/recaptcha.php directory and make sure the version is 'v2' like the code snippet above.
Added Google Recaptcha Validation
protected function validator(array $data)
    {
        return Validator::make($data, [
            'name' => ['required', 'string', 'max:255'],
            'email' => ['required', 'string', 'email', 'max:255', 'unique:users'],
            'password' => ['required', 'string', 'min:8', 'confirmed'],
            'g-recaptcha-response' => 'recaptcha',
        ]);
    }
So that users cannot continue using the application before completing the challenge from google recaptcha, we need to add a validator first. For that, we add 'g-recaptcha-response' => 'recaptcha', in the app/Http/Controllers/Auth/RegisterController.php file or more precisely in the validator function like the example above.
Showing Google Recaptcha on Laravel Register Page
{!! ReCaptcha::htmlScriptTagJsApi() !!}Open the layouts/app.blade.php file, then add the code above between the <head></head> tags
<div class="form-group row">
	<label class="col-md-4 col-form-label text-md-right">Laravel Google Recaptcha</label>
	<div class="col-md-6"> {!! htmlFormSnippet() !!} </div>
</div>
Then, to display the checkbox version of the google recaptcha, add the code above to the resources/views/auth/register.blade.php file and place it under the group password confirm form.
@extends('layouts.app') @section('content')
<div class="container">
    <div class="row justify-content-center">
        <div class="col-md-8">
            <div class="card">
                <div class="card-header">Laravel Google ReCaptcha</div>
                <div class="card-body">
                    <form method="POST" action="{{ route('register') }}">
                        @csrf
                        <div class="form-group row">
                            <label for="name" class="col-md-4 col-form-label text-md-right">{{ __('Name') }}</label>
                            <div class="col-md-6">
                                <input id="name" type="text" class="form-control @error('name') is-invalid @enderror" name="name" value="{{ old('name') }}" required autocomplete="name" autofocus>
                                @error('name')
                                    <span class="invalid-feedback" role="alert">
                                        <strong>{{ $message }}</strong>
                                    </span>
                                @enderror
                            </div>
                        </div>
                        <div class="form-group row">
                            <label for="email" class="col-md-4 col-form-label text-md-right">{{ __('E-Mail Address') }}</label>
                            <div class="col-md-6">
                                <input id="email" type="email" class="form-control @error('email') is-invalid @enderror" name="email" value="{{ old('email') }}" required autocomplete="email">
                                @error('email')
                                    <span class="invalid-feedback" role="alert">
                                        <strong>{{ $message }}</strong>
                                    </span>
                                @enderror
                            </div>
                        </div>
                        <div class="form-group row">
                            <label for="password" class="col-md-4 col-form-label text-md-right">{{ __('Password') }}</label>
                            <div class="col-md-6">
                                <input id="password" type="password" class="form-control @error('password') is-invalid @enderror" name="password" required autocomplete="new-password">
                                @error('password')
                                    <span class="invalid-feedback" role="alert">
                                        <strong>{{ $message }}</strong>
                                    </span>
                                @enderror
                            </div>
                        </div>
                        <div class="form-group row">
                            <label for="password-confirm" class="col-md-4 col-form-label text-md-right">{{ __('Confirm Password') }}</label>
                            <div class="col-md-6">
                                <input id="password-confirm" type="password" class="form-control" name="password_confirmation" required autocomplete="new-password">
                            </div>
                        </div>
                        <div class="form-group row">
                            <label class="col-md-4 col-form-label text-md-right">Laravel Google Recaptcha</label>
                            <div class="col-md-6"> {!! htmlFormSnippet() !!} </div>
                        </div>
                        <div class="form-group row mb-0">
                            <div class="col-md-6 offset-md-4">
                                <button type="submit" class="btn btn-primary"> {{ __('Register') }} </button>
                            </div>
                        </div>
                    </form>
                </div>
            </div>
        </div>
    </div>
</div>
@endsection
So now overall, the code in the register.blade.php file will be as above with the addition of a form group for laravel google recaptcha.
Testing Google Recaptcha in Laravel 8

After going through the processes starting from installing the latest laravel, registering google recaptcha, installing the laravel recaptcha package, to setup to be able to use google recaptcha on laravel, and now it's time for testing. Please run the laravel project, then open it in a browser and go to the register page. When we click the checkbox, it will display a challenge from google recaptcha as in the example image above. If we don't click the verification checkbox or make a mistake in completing the challenge, we can't continue registering the user either.
Source: laravel-recaptcha-docs.biscolab.com
Web illustrations by Storyset
- Cara Mengatasi Error XAMPP: MySQL shutdown unexpectedly 23 Oktober 2021 68249 views
- Tutorial CRUD (Create, Read, Update & Delete) Codeigniter 4 dengan Bootstrap 14 Oktober 2021 33745 views
- Laravel 8: REST API Authentication dengan Sanctum 17 September 2021 32656 views
- Membuat REST API CRUD di Laravel 8 dengan Sanctum 18 September 2021 28843 views
- Contoh Cara Menggunakan Sweet Alert di Laravel 8 27 Agustus 2021 28216 views