


How to Integrate TinyMCE 5 With Laravel File Manager in Laravel 8
TinyMCE 5 integration in Laravel 8 - On this occasion, I will share an article with the topic of how to integrate TinyMCE 5 with the laravel file manager in laravel 8. In this article, we are not limited to learning how to install TinyMCE in laravel 8, but also learning how to install laravel files. manager to manage files in the project and also learn how to install the TinyMCE pluggin.
Before going to the steps on how to integrate TinyMCE 5 in Laravel 8, we will first get acquainted with TinyMCE.
Table of Contents
- What is TinyMCE ?
- TinyMCE 5 integration in Laravel 8
- Register a Tinymce or Tinycloud Account
- Install Laravel
- Install Laravel ui
- Create Model dan Migration
- Edit home.blade.php
- Edit HomeController.php
- Create File create.blade.php
- Install Laravel File Manager
- Edit .env
- Edit Route Web.php
- Edit Create.blade.php
- Install Plugin Autosave
- Install Plugin Code Sample
- Save data Post to database
- Display Post
- Conclusion
What is TinyMCE ?
TinyMCE is one of the best text editors out of several text editors currently available. TinyMCE is also a WYSIWYG editor that is flexible, customizable and designed with user needs in mind. TinyMCE can be adapted to any situation, from deployment in the simplest projects to deployment in the most complex projects. TinyMCE, which is also a product of tiny.cloud, has been used by several major world brands such as Microsoft, Nasa, Shopify, Atlassian and other major world brands. Besides TinyMCE, tiny.cloud also has other products on offer, namely Drive and MoxieManager.
TinyMCE gives us a choice of versions, namely free and premium or paid. If we use the free version, what features will we get or what we can use? The following are some of the TinyMCE features that we can use in the free version of TinyMCE:
- Advanced List
- Anchor
- Autolink
- Autoresize
- Autosave
- BBCode
- Character Map
- Code
- Code Sample
- Color Picker
- Directionality
- Emoticons
- Full Page
- Help
- Horizontal Rule
- Image
- Image Tools
- Import CSS
- Insert Date/Time
- Legacy Output
- Link
- List
- Media
- Nonbreaking Space
- Noneditable
- Page Break
- Paste
- Preview
- Quick Toolbar
- Save
- Search and Replace
- Spell Checker
- Tab Focus
- Table
- Template
- Text Color
- Text Pattern
- Table of Contents
- Visual Blocks
- Visual Characters
- Word Count
And for information, by using the free version of TinyMCE 5, we cannot upload images or files. We can only upload with a link that points to the file or image, that's why in this article, we will use the Laravel package file manager.
We also use the free version of TinyMCE 5, and the favorite features are Autosave to store cached data in storage if at any time the PC or laptop dies the data we inputted before can still be recovered, Code Sample for input source code, Table of Contents to create table of contents like in wordpress and word count to find out how many words have been inputted.
TinyMCE 5 integration in Laravel 8
After getting acquainted with TinyMCE, let's start trying to install or integrate TinyMCE 5 in laravel 8 from scratch.
Register a Tinymce or Tinycloud Account

To get the API key to be able to use TinyMCE, we must first register an account on Tiny.Cloud. On this page we must register our active email (because there will be email verification) and enter a password of at least 8 characters consisting of uppercase, lowercase letters and numbers. If it is filled, please click "Create my Tiny account". Then check our email inbox, there is a verification email from tiny.cloud, please click confirm.
OK, now please try to check on your tiny.cloud dashboard. We've got the API key to use TinyMCE in our project. And if you look at the Approved Domain menu on the sidebar, by default tiny cloud has registered localhost which in this experiment we will run TinyMCE on a local server or localhost, it's different if we want to use TinyMCE on a live project. For example, we want to run TinyMCE on our project, let's say the domain name is example.com, then we have to register or add the domain example.com in the Approved Domains menu.
Install Laravel
composer create-project laravel/laravel laratinySince we have successfully registered and obtained the TinyMCE API key, our next step will be to start installing laravel 8 or the latest version of laravel when this article was written. Open a terminal, go to the directory where we want to install the laravel project for this TinyMCE 5 integration experiment in Laravel 8, then run the command above.
Install Laravel ui
composer require laravel/uiphp artisan ui bootstrap --authnpm install && npm run devSo in this experiment, later we will implement TinyMCE 5 in Laravel 8 when the user creates Post, where to be able to enter the Post menu and take action, the user must have logged in first because we will protect the Post manual later with middleware. Therefore we need to create Authentication first and to create authentication in this TinyMCE 5 integration trial project in Laravel 8 we will use the laravel ui package. Run the above commands sequentially.
So that the data from this experiment can later be stored in the database, we must create a new database which in this experiment I will create a new database with the name laratiny. If the database has been created, don't forget to also adjust the DB_DATABASE in the .env file, adjust it as with the name of the newly created database. If so, run php artisan migrate.

If the laravel ui install process has been completed, now please try to run the project then try to register the user it will be directed to the home page as shown above. Well here later we will try to display Post data and create a post with a textarea display using TinyMCE 5.
Create Model dan Migration
php artisan make:model Post -mThe next step is to create a model and migration file for Post. Run the command as above to create Post Models and Migration files.
<?php

use Illuminate\Database\Migrations\Migration;
use Illuminate\Database\Schema\Blueprint;
use Illuminate\Support\Facades\Schema;

class CreatePostsTable extends Migration
{
    /**
     * Run the migrations.
     *
     * @return void
     */
    public function up()
    {
        Schema::create('posts', function (Blueprint $table) {
            $table->id();
            $table->string('title');
            $table->string('slug');
            $table->longText('desc');
            $table->timestamps();
        });
    }

    /**
     * Reverse the migrations.
     *
     * @return void
     */
    public function down()
    {
        Schema::dropIfExists('posts');
    }
}
If the Model and Migration files have been created, please open the Post migration file in the database/migrations folder then adjust the code as shown above. Then run php artisan migrate again.
Edit home.blade.php
As I mentioned earlier, we will change the dashboard display when the user successfully registers or logs in to a view to display Post data and create a button to create Post. For that, please open the home.blade.php file and then change or adjust the code to be as below.
@extends('layouts.app')

@section('content')
<div class="container">
    <div class="row justify-content-center">
        <div class="col-md-8">
            <a href="{{ route('create') }}" class="btn btn-success btn-sm mb-2">Create Post</a>
            <table class="table">
                <thead>
                  <tr>
                    <th scope="col">#</th>
                    <th scope="col">First</th>
                    <th scope="col">Last</th>
                    <th scope="col">Handle</th>
                  </tr>
                </thead>
                <tbody>
                  <tr>
                    <th scope="row">1</th>
                    <td>Mark</td>
                    <td>Otto</td>
                    <td>@mdo</td>
                  </tr>
                  <tr>
                    <th scope="row">2</th>
                    <td>Jacob</td>
                    <td>Thornton</td>
                    <td>@fat</td>
                  </tr>
                  <tr>
                    <th scope="row">3</th>
                    <td colspan="2">Larry the Bird</td>
                    <td>@twitter</td>
                  </tr>
                </tbody>
              </table>
        </div>
    </div>
</div>
@endsection
In the code above, we have created a create button that will point to route('create'), but we still don't have that route. If the route is not created first, it will error Route['create'] not defined. For that we will create a route create in the routes/web.php file, please open the file and add the code below.
Route::get('/create', [App\Http\Controllers\HomeController::class, 'create'])->name('create');
Okay, now please open the dashboard or /home view again, then it will look like the picture above. The displayed data is still static? yup, because we haven't made the Create Post feature yet.
Edit HomeController.php
public function create()
    {
        return view('create');
    }
Here later we don't need to create a new controller for the Post handle, we can use HomeController.php as an example. Open the HomeController.php file then add a new function that returns view create. We have registered this function in the web.php route in the previous step, it's just that for now when we click "create post" the view doesn't exist error because we haven't created the create.blade.php file.
Create File create.blade.php
@extends('layouts.app')

@section('content')
<div class="container">
    <div class="row justify-content-center">
        <div class="col-md-8">
            <form>
                <div class="mb-3">
                  <label for="title" class="form-label">Title</label>
                  <input type="text" class="form-control" id="title">
                </div>
                <div class="mb-3">
                  <label for="desc" class="form-label">Desc</label>
                  <textarea name="desc" class="my-editor form-control" id="desc" cols="30" rows="10"></textarea>
                </div>
                <button type="submit" class="btn btn-primary">Submit</button>
              </form>
        </div>
    </div>
</div>
@endsection

@push('scripts')
<script src="https://cdn.tiny.cloud/1/m1nz6lkq0ki8c21mhmdrhi8pfa5sjru7d79jblmku8iu0e3u/tinymce/5/tinymce.min.js" referrerpolicy="origin"></script>
<script>
    tinymce.init({
      selector: 'textarea.my-editor',
      plugins: 'a11ychecker advcode casechange formatpainter linkchecker autolink lists checklist media mediaembed pageembed permanentpen powerpaste table advtable tinycomments tinymcespellchecker',
      toolbar: 'a11ycheck addcomment showcomments casechange checklist code formatpainter pageembed permanentpen table',
      toolbar_mode: 'floating',
      tinycomments_mode: 'embedded',
      tinycomments_author: 'Author name',
   });
  </script>
@endpush
Create a new view file with the name create.blade.php parallel to home.blade.php, then input the code as above. In the code above, we create 2 forms, namely title and desc (the slug is not made a form because the slug data will follow the title data). If we look at the code above, we push the TinyMCE.min.js and TinyMCE init scripts.
![]()
In the script code that I highlighted as shown above is our TinyMCE API Key. Please replace the code above with your TinyMCE API key which can be found on your TinyMCE dashboard.
@stack('scripts')Then in the create.blade.php code we create a push(scripts) section, therefore please open the file in layouts/app.blade.php then add the @stack('scripts') code above the </body> tag.
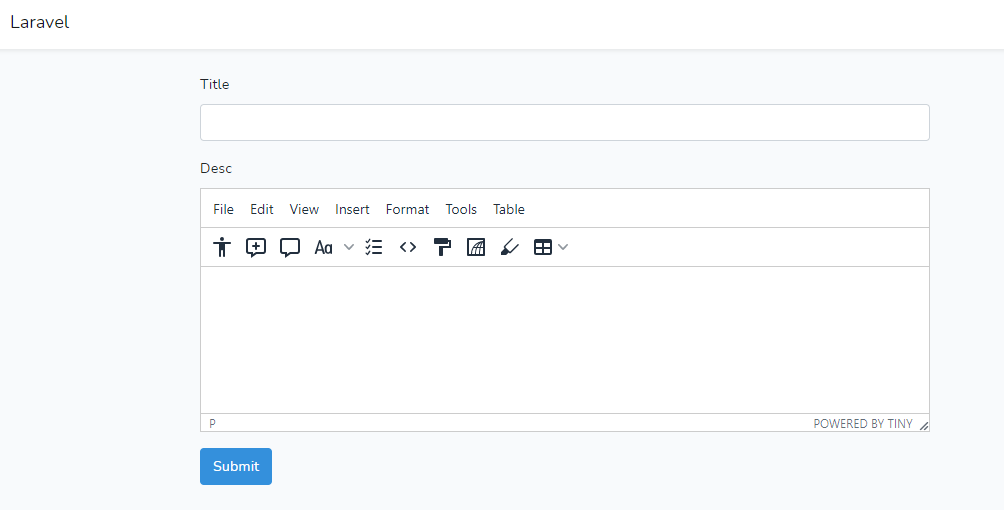
if you have added @stack('scripts') in the app.blade.php file, now please open /create or click the create post button it will display as shown above.
*There may be some errors that appear "this domain is not registered with Tiny Cloud" because the domain registered in your Tiny Cloud account is localhost while you access the project with 127.0.0.1. The solution is to replace the URL with localhost:8000/create or register a new domain that is 127.0.0.1 in the approved domain menu (Tiny Cloud).
OK, so far we have successfully installed or integrated TinyMCE 5 in laravel 8. However, we have not been able to insert an image nor have we been able to insert a code sample (Code Sample is usually used by blog owners or niche programming websites to display code samples), for that In the next step we will change TinyMCE 5 in our Laravel project according to our needs by adding a package or adding an open source plugin from TinyMCE itself.
Install Laravel File Manager
composer require unisharp/laravel-filemanager php artisan vendor:publish --tag=lfm_config php artisan vendor:publish --tag=lfm_public php artisan storage:linkNext we will install the laravel file manager package from unisharp . We use this Laravel File Manager package in the TinyMCE 5 integration project in Laravel 8 for file or image management like in wordpress or blogger. Why do we choose this package from Unisharp? because Unisharp provides several mainstay features such as CKeditor & TinyMCE integration, uploading validatin, Cropping & Resizing of Images and others. To start using the laravel file manager package on TinyMCE 5 in laravel, please run the above commands in sequence.
php artisan vendor:publish --tag=lfm_config
php artisan vendor:publish --tag=lfm_public
The command above is the command to publish package config and assets
Edit .env
Edit the APP_URL in the .env file with your domain or project url. This means that if we run this TinyMCE 5 integration trial project in laravel 8 at URL 127.0.0.1:8000, we must also change the APP_URL to 127.0.0.1:8000. And if run on URL laratiny.test, in APP_URL it should be laratiny.test and so on.
Edit Route Web.php
Route::group(['prefix' => 'laravel-filemanager', 'middleware' => ['web', 'auth']], function () {
     \UniSharp\LaravelFilemanager\Lfm::routes();
 });
Open the web.php file in the routes folder, then add a route group like the code above. See the code above, we put the web auth middleware on the route group. That means if the user is not logged in and the user accesses the domain/laravel-filemanager, the user will be directed to the login page first.
Edit Create.blade.php
@extends('layouts.app')

@section('content')
<div class="container">
    <div class="row justify-content-center">
        <div class="col-md-8">
            <form>
                <div class="mb-3">
                  <label for="title" class="form-label">Title</label>
                  <input type="text" class="form-control" id="title">
                </div>
                <div class="mb-3">
                  <label for="desc" class="form-label">Desc</label>
                  <textarea name="desc" class="my-editor form-control" id="desc" cols="30" rows="10"></textarea>
                </div>
                <button type="submit" class="btn btn-primary">Submit</button>
              </form>
        </div>
    </div>
</div>
@endsection

@push('scripts')
<script src="https://cdn.tiny.cloud/1/m1nz6lkq0ki8c21mhmdrhi8pfa5sjru7d79jblmku8iu0e3u/tinymce/5/tinymce.min.js" referrerpolicy="origin"></script>
<script>
    var editor_config = {
      path_absolute : "/",
      selector: 'textarea.my-editor',
      relative_urls: false,
      plugins: [
        "advlist autolink lists link image charmap print preview hr anchor pagebreak",
        "searchreplace wordcount visualblocks visualchars code fullscreen",
        "insertdatetime media nonbreaking save table directionality",
        "emoticons template paste textpattern"
      ],
      toolbar: "insertfile undo redo | styleselect | bold italic | alignleft aligncenter alignright alignjustify | bullist numlist outdent indent | link image media",
      file_picker_callback : function(callback, value, meta) {
        var x = window.innerWidth || document.documentElement.clientWidth || document.getElementsByTagName('body')[0].clientWidth;
        var y = window.innerHeight|| document.documentElement.clientHeight|| document.getElementsByTagName('body')[0].clientHeight;

        var cmsURL = editor_config.path_absolute + 'laravel-filemanager?editor=' + meta.fieldname;
        if (meta.filetype == 'image') {
          cmsURL = cmsURL + "&type=Images";
        } else {
          cmsURL = cmsURL + "&type=Files";
        }

        tinyMCE.activeEditor.windowManager.openUrl({
          url : cmsURL,
          title : 'Filemanager',
          width : x * 0.8,
          height : y * 0.8,
          resizable : "yes",
          close_previous : "no",
          onMessage: (api, message) => {
            callback(message.content);
          }
        });
      }
    };

    tinymce.init(editor_config);
  </script>
@endpush
Then open the create.blade.php file again and replace all the code with the code as above (Here we adjust the script section). If you have, save and try to open the create page or rather please try the upload or insert image feature.
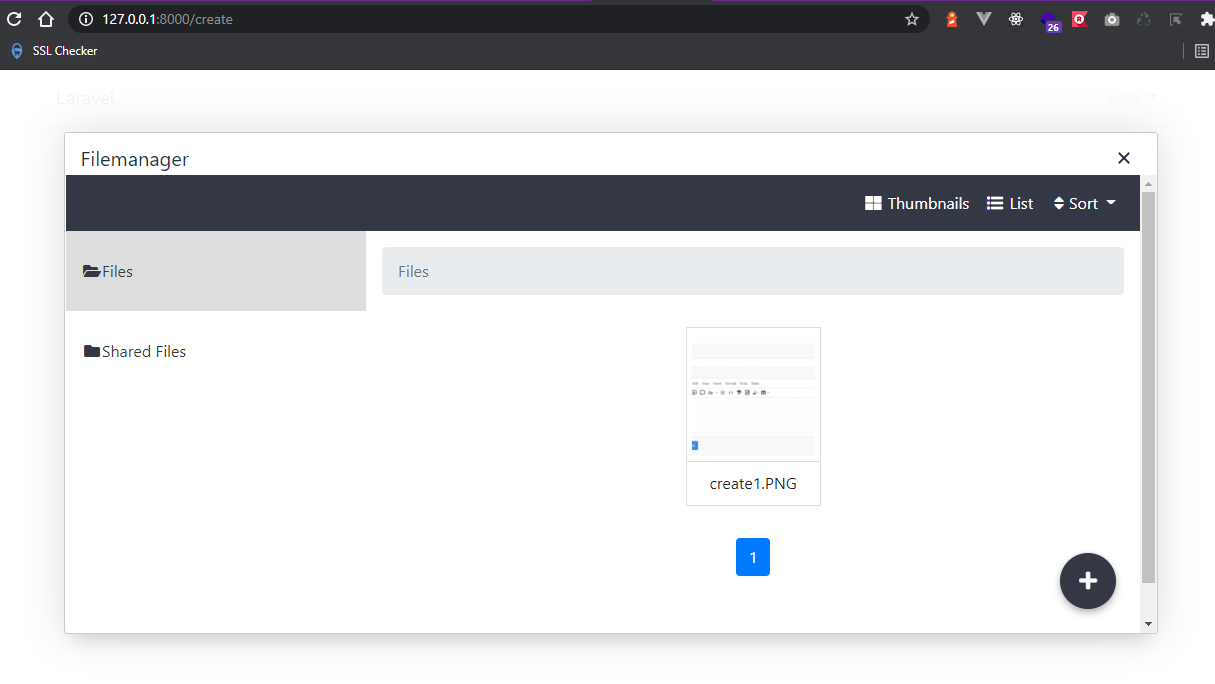
Well done, we have successfully created a file manager in the TinyMCE 5 integration project in laravel 8. Next we will try to install opensource pluggins such as autosave and sample code.
Install Plugin Autosave

To use the autosave plugin from TinyMCE, it's quite easy, just add autosave to the plugins and restoreraft to the toolbar in the TinyMCE script (in create.blade.php). So with the autosave plugin, when we have entered a lot of content and then suddenly our PC or laptop has problems, we don't need to worry about re-entering, just click the (restoredraft) icon on the toolbar. To see how it works, please try inputting text or anything in the textarea then try reloading the page. After the page is reloaded and the textarea is empty again, please try clicking the restoredraft icon.
More at https://www.tiny.cloud/docs/plugins/opensource/autosave/
Install Plugin Code Sample
To install the code sample plugin is quite easy too, do what we have done in the autosave plugin install step, namely by adding the codesample in the plugins and the codesample in the toolbar.
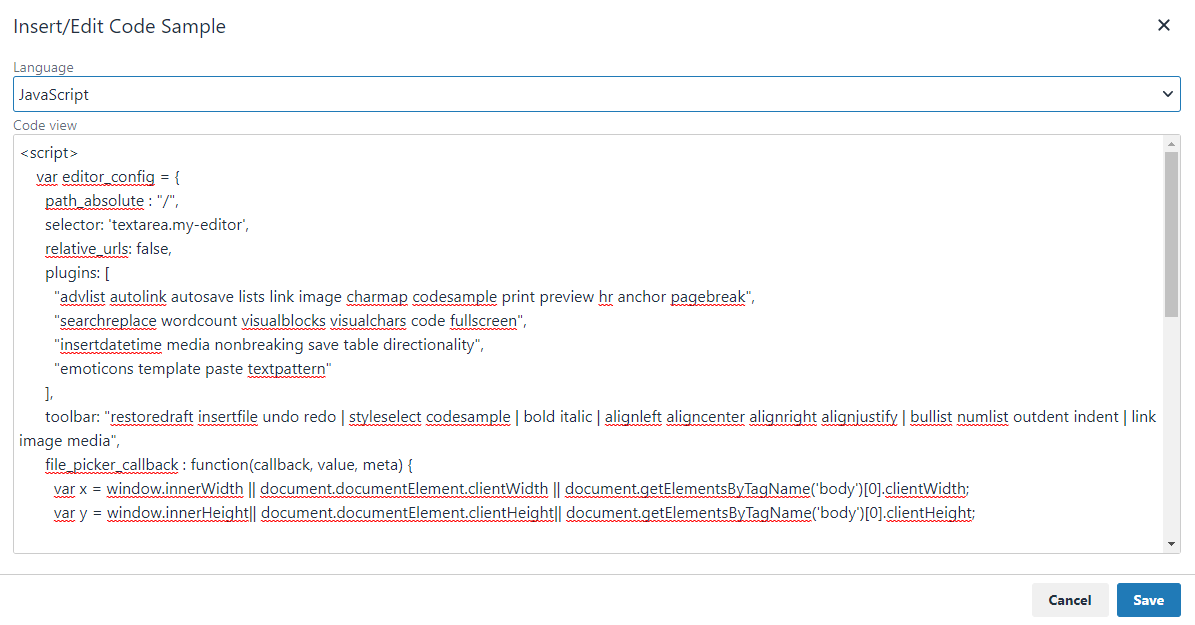
After the codesample has been added in the plugin and toolbar, now try to reload the page and click the codesample icon (comma {;}). Then it will display as shown above. With that feature we can create content that contains code from several programming languages. By default, TinyMCE uses prism.js for the codesample view so to produce a beautiful codesample view we have to add prism.css and prism.js on the page containing the codesample content. For the addition of prism.css and prims.js will be in the next step.
More at https://www.tiny.cloud/docs/plugins/opensource/codesample/.
Save data Post to database
After learning how to install TinyMCE 5 in laravel 8, how to install and integrate the laravel file manager in TinyMCE 5, install plugins, then we will continue to save the create post data to the database.
<form action="{{ route('store') }}" method="POST">
                @csrf
                <div class="mb-3">
                  <label for="title" class="form-label">Title</label>
                  <input type="text" name="title" class="form-control" id="title">
                </div>
                <div class="mb-3">
                  <label for="desc" class="form-label">Desc</label>
                  <textarea name="desc" class="my-editor form-control" id="desc" cols="30" rows="10"></textarea>
                </div>
                <button type="submit" class="btn btn-primary">Submit</button>
              </form>
Open the create.blade.php file, then change the form section to be like in the code example above. Here we will point the form to the route store (the route store we will create in the steps below).
Route::post('/create', [App\Http\Controllers\HomeController::class, 'store'])->name('store');Open the route web.php file again and add the above code. In the route store, we will call the store function in the HomeController.php file, we will create the function in the steps below.
public function store(Request $request)
    {
        $data           = new \App\Models\Post;
        $data->title    = $request->title;
        $data->slug     = \Str::slug(request('title'));
        $data->desc     = $request->desc;
        $data->save();

        return redirect('home');
    }
Open the HomeController.php file and add a function store with the above code. The code above is a simple code example to run the input data command to the post table from the request that has been inputted on the form available on the create page. Now save, and try to enter the create page then enter text or content in the title and desc form then click submit. Then we will be directed to the home page and if we check in the Post table (database) the data that we have submitted has been entered but the data displayed on the home page is still static data. We will make slight changes to the home.blade.php and HomeController.php files so that the data displayed on the home page can be retrieved from the database.
@extends('layouts.app')

@section('content')
<div class="container">
    <div class="row justify-content-center">
        <div class="col-md-8">
            <a href="{{ route('create') }}" class="btn btn-success btn-sm mb-2">Create Post</a>
            <table class="table">
                <thead>
                  <tr>
                    <th scope="col">#</th>
                    <th scope="col">Title</th>
                    <th scope="col">Slug</th>
                    <th scope="col">Desc</th>
                  </tr>
                </thead>
                <tbody>
                    @php
                        $no = 0;
                    @endphp
                  @foreach ($data as $data)
                  <tr>
                    <th scope="row">{{ ++$no }}</th>
                    <td>{{ $data->title }}</td>
                    <td>{{ $data->slug }}</td>
                    <td>{!! Str::limit( strip_tags( $data->desc ), 50 ) !!}</td>
                  </tr>
                  @endforeach

                </tbody>
              </table>
        </div>
    </div>
</div>
@endsection
Open the home.blade.php file, then change all the code to be like the code above.
public function index()
    {
        $data = \App\Models\Post::all();
        return view('home',['data' => $data]);
    }
Then open the HomeController.php file, in the function index change it to be like the code above. Where if we look at the code above, we retrieve the data from the Post Model.
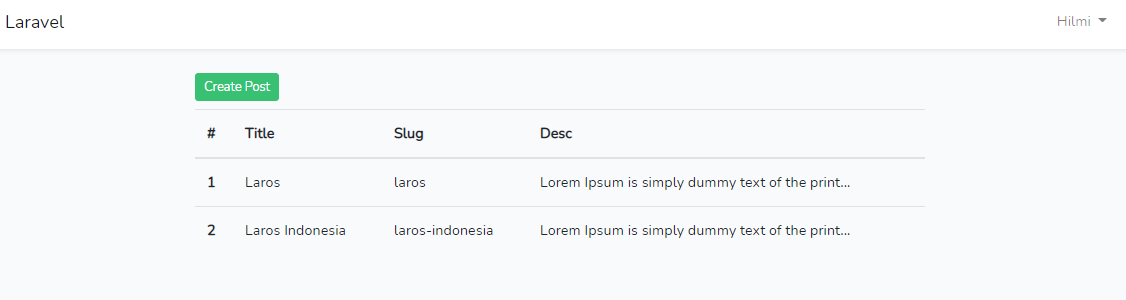
If the home.blade.php and HomeController.php files have been adjusted, now save the changes and try to see on the home page, the display will change to dynamically retrieving data from the database as shown above.
Then we also want to see what the post we've created previously looks like. For that we need to change the data in welcome.blade.php and add a new view file to see the details of the post.
Display Post
<!DOCTYPE html>
<html lang="{{ str_replace('_', '-', app()->getLocale()) }}">
    <head>
        <meta charset="utf-8">
        <meta name="viewport" content="width=device-width, initial-scale=1">

        <title>TinyMCE 5 Laravel</title>

        <!-- Fonts -->
        <link href="https://fonts.googleapis.com/css2?family=Nunito:wght@400;600;700&display=swap" rel="stylesheet">

        <link href="https://cdn.jsdelivr.net/npm/bootstrap@5.0.0-beta2/dist/css/bootstrap.min.css" rel="stylesheet" integrity="sha384-BmbxuPwQa2lc/FVzBcNJ7UAyJxM6wuqIj61tLrc4wSX0szH/Ev+nYRRuWlolflfl" crossorigin="anonymous">
        <!-- Styles -->
        <style>
            /*! normalize.css v8.0.1 | MIT License | github.com/necolas/normalize.css */html{line-height:1.15;-webkit-text-size-adjust:100%}body{margin:0}a{background-color:transparent}[hidden]{display:none}html{font-family:system-ui,-apple-system,BlinkMacSystemFont,Segoe UI,Roboto,Helvetica Neue,Arial,Noto Sans,sans-serif,Apple Color Emoji,Segoe UI Emoji,Segoe UI Symbol,Noto Color Emoji;line-height:1.5}*,:after,:before{box-sizing:border-box;border:0 solid #e2e8f0}a{color:inherit;text-decoration:inherit}svg,video{display:block;vertical-align:middle}video{max-width:100%;height:auto}.bg-white{--bg-opacity:1;background-color:#fff;background-color:rgba(255,255,255,var(--bg-opacity))}.bg-gray-100{--bg-opacity:1;background-color:#f7fafc;background-color:rgba(247,250,252,var(--bg-opacity))}.border-gray-200{--border-opacity:1;border-color:#edf2f7;border-color:rgba(237,242,247,var(--border-opacity))}.border-t{border-top-width:1px}.flex{display:flex}.grid{display:grid}.hidden{display:none}.items-center{align-items:center}.justify-center{justify-content:center}.font-semibold{font-weight:600}.h-5{height:1.25rem}.h-8{height:2rem}.h-16{height:4rem}.text-sm{font-size:.875rem}.text-lg{font-size:1.125rem}.leading-7{line-height:1.75rem}.mx-auto{margin-left:auto;margin-right:auto}.ml-1{margin-left:.25rem}.mt-2{margin-top:.5rem}.mr-2{margin-right:.5rem}.ml-2{margin-left:.5rem}.mt-4{margin-top:1rem}.ml-4{margin-left:1rem}.mt-8{margin-top:2rem}.ml-12{margin-left:3rem}.-mt-px{margin-top:-1px}.max-w-6xl{max-width:72rem}.min-h-screen{min-height:100vh}.overflow-hidden{overflow:hidden}.p-6{padding:1.5rem}.py-4{padding-top:1rem;padding-bottom:1rem}.px-6{padding-left:1.5rem;padding-right:1.5rem}.pt-8{padding-top:2rem}.fixed{position:fixed}.relative{position:relative}.top-0{top:0}.right-0{right:0}.shadow{box-shadow:0 1px 3px 0 rgba(0,0,0,.1),0 1px 2px 0 rgba(0,0,0,.06)}.text-center{text-align:center}.text-gray-200{--text-opacity:1;color:#edf2f7;color:rgba(237,242,247,var(--text-opacity))}.text-gray-300{--text-opacity:1;color:#e2e8f0;color:rgba(226,232,240,var(--text-opacity))}.text-gray-400{--text-opacity:1;color:#cbd5e0;color:rgba(203,213,224,var(--text-opacity))}.text-gray-500{--text-opacity:1;color:#a0aec0;color:rgba(160,174,192,var(--text-opacity))}.text-gray-600{--text-opacity:1;color:#718096;color:rgba(113,128,150,var(--text-opacity))}.text-gray-700{--text-opacity:1;color:#4a5568;color:rgba(74,85,104,var(--text-opacity))}.text-gray-900{--text-opacity:1;color:#1a202c;color:rgba(26,32,44,var(--text-opacity))}.underline{text-decoration:underline}.antialiased{-webkit-font-smoothing:antialiased;-moz-osx-font-smoothing:grayscale}.w-5{width:1.25rem}.w-8{width:2rem}.w-auto{width:auto}.grid-cols-1{grid-template-columns:repeat(1,minmax(0,1fr))}@media (min-width:640px){.sm\:rounded-lg{border-radius:.5rem}.sm\:block{display:block}.sm\:items-center{align-items:center}.sm\:justify-start{justify-content:flex-start}.sm\:justify-between{justify-content:space-between}.sm\:h-20{height:5rem}.sm\:ml-0{margin-left:0}.sm\:px-6{padding-left:1.5rem;padding-right:1.5rem}.sm\:pt-0{padding-top:0}.sm\:text-left{text-align:left}.sm\:text-right{text-align:right}}@media (min-width:768px){.md\:border-t-0{border-top-width:0}.md\:border-l{border-left-width:1px}.md\:grid-cols-2{grid-template-columns:repeat(2,minmax(0,1fr))}}@media (min-width:1024px){.lg\:px-8{padding-left:2rem;padding-right:2rem}}@media (prefers-color-scheme:dark){.dark\:bg-gray-800{--bg-opacity:1;background-color:#2d3748;background-color:rgba(45,55,72,var(--bg-opacity))}.dark\:bg-gray-900{--bg-opacity:1;background-color:#1a202c;background-color:rgba(26,32,44,var(--bg-opacity))}.dark\:border-gray-700{--border-opacity:1;border-color:#4a5568;border-color:rgba(74,85,104,var(--border-opacity))}.dark\:text-white{--text-opacity:1;color:#fff;color:rgba(255,255,255,var(--text-opacity))}.dark\:text-gray-400{--text-opacity:1;color:#cbd5e0;color:rgba(203,213,224,var(--text-opacity))}}
        </style>

        <style>
            body {
                font-family: 'Nunito', sans-serif;
            }
        </style>
    </head>
    <body class="antialiased">
        <div class="container">
            <div class="row">
                <div class="relative flex items-top justify-center min-h-screen sm:items-center py-4 sm:pt-0">
                    @if (Route::has('login'))
                        <div class="hidden fixed top-0 right-0 px-6 py-4 sm:block">
                            @auth
                                <a href="{{ url('/home') }}" class="text-sm text-gray-700 underline">Home</a>
                            @else
                                <a href="{{ route('login') }}" class="text-sm text-gray-700 underline">Log in</a>

                                @if (Route::has('register'))
                                    <a href="{{ route('register') }}" class="ml-4 text-sm text-gray-700 underline">Register</a>
                                @endif
                            @endauth
                        </div>
                    @endif

                   @foreach ($post as $post)
                   <div class="col-md-4 m-2">
                    <div class="card">
                        <div class="card-body">
                          <h5 class="card-title">{{ $post->title }}</h5>
                          <p class="card-text">{!!  Str::limit( strip_tags( $post->desc ), 50 ) !!}</p>
                          <a href="{{ route('detail',$post->slug) }}" class="btn btn-primary">Detail</a>
                        </div>
                      </div>
                   </div>
                   @endforeach

                </div>
            </div>
        </div>
        <script src="https://cdn.jsdelivr.net/npm/bootstrap@5.0.0-beta2/dist/js/bootstrap.bundle.min.js" integrity="sha384-b5kHyXgcpbZJO/tY9Ul7kGkf1S0CWuKcCD38l8YkeH8z8QjE0GmW1gYU5S9FOnJ0" crossorigin="anonymous"></script>
    </body>
</html>
To be able to display post data, we will first change the code in the welcome.blade.php file. Open the welcome.blade.php file and then replace all the code with the above code. Here we will display post data in welcome.blade.php with card style and by adding bootstrap.
Route::get('/', function () {
    $post = \App\Models\Post::all();
    return view('welcome',['post' => $post]);
});
Then we need to change the welcome route a bit. Open the web.php file, and change it to be like the code above.
Route::get('/post/{slug}', function($slug) {
    $post = \App\Models\Post::where('slug',$slug)->firstOrFail();
    return view('detail',['post' => $post]);
})->name('detail');
Next we also need to add a new route to be able to display the details of the post. Add the code in the web.php file or rather under the welcome route.
@extends('layouts.app')

@section('content')
    <div class="container">
        <div class="row">
            <div class="card">
                <h5 class="card-header">Detail</h5>
                <div class="card-body">
                  <h5 class="card-title">{{ $post->title }}</h5>
                  <p class="card-text">{!! $post->desc !!}</p>
                </div>
              </div>
        </div>
    </div>
@endsection
Then, create a new view file parallel to home or welcome with the name detail.blade.php and enter the above code in the newly created detail file. After changing the web.php file, welcome.blade.php and adding the detail.blade.php file, let's see the result.

The picture above is a new welcome screen after we make changes to the welcome.blade.php and web.php files. We can see, the welcome displays data taken from the database where the data was previously created on the /create page.

And when on the welcome page we click on the details of one of the data (cards), then it will look like the picture above. But as I mentioned earlier, the codesample display will look beautiful if we use prism.css and prism.js. Therefore, let's add the prism.css and prism.js files to the public folder. But first, please visit the official website and download the css and js prismjs.com first here. After successfully downloading, move the prism.css and prism.js files into the public/vendor folder.
<link rel="stylesheet" href="{{ asset('vendor/prism.css') }}">
Then add the above code to the app.blade.php file at the top of the </head> tag.
<script src="{{ asset('vendor/prism.js') }}"></script>And add the above code in the app.blade.php file too but in the section before the </body> tag
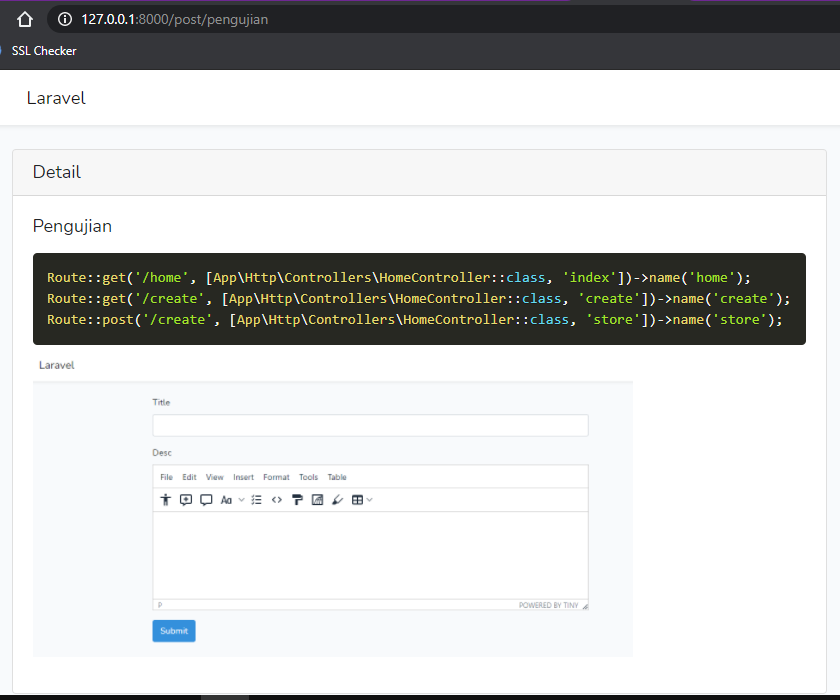
If you have added the prism.css and prism.js files, now try to check again on the post details page. Then it will look like the picture above, the codesample display is better than the previous codesample display.
Conclusion
In this article we have learned how to use, how to install or how to integrate TinyMCE 5 with Laravel File Manager in Laravel 8. Actually to install TinyMCE 5 on Laravel 8 is quite easy and short, it's just that in this article we don't just learn to install TinyMCE 5 in laravel 8 but also learn how to integrate Laravel File Manager in TinyMCE 5, learn how to install or add plugins in TinyMCE 5 and learn how to implement TinyMCE 5 in a simple project made with laravel 8, so the steps in this article feel very long. TinyMCE 5 is one of the best text editors today with various free features provided. If you are creating a project that requires content management, I can recommend using TinyMCE 5 because it is quite easy to apply to Laravel and other frameworks.
That's an article about how to integrate TinyMCE 5 in Laravel 8 this time, maybe in the next article we will also learn how to implement or integrate CKeditor in Laravel. If there are criticisms, suggestions or anything that you want to discuss, please write them in the comment form below.
see you.
Ref:
- Cara Mengatasi Error XAMPP: MySQL shutdown unexpectedly 23 Oktober 2021 68155 views
- Tutorial CRUD (Create, Read, Update & Delete) Codeigniter 4 dengan Bootstrap 14 Oktober 2021 33594 views
- Laravel 8: REST API Authentication dengan Sanctum 17 September 2021 32631 views
- Membuat REST API CRUD di Laravel 8 dengan Sanctum 18 September 2021 28824 views
- Contoh Cara Menggunakan Sweet Alert di Laravel 8 27 Agustus 2021 28189 views